The interface
Every part of the window, named. The rest of this documentation points at these things without describing them again.
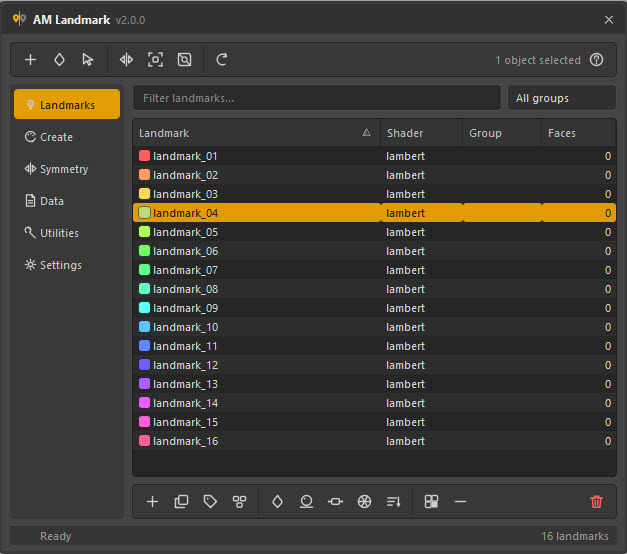
The caption bar at the top, the toolbar under it, the page rail down the left, the landmark list filling the middle, the row of actions under it, and the status bar at the bottom.
The window itself
AM Landmark draws its own title bar rather than using the operating system's, so it looks the same on Windows, macOS and Linux and matches the other AM tools sitting beside it.
| Part | What it is |
|---|---|
| Caption bar | The product mark, the name, and the version. Drag any empty part of it to move the window. The ✕ on the right closes it. |
| Toolbar | The actions that apply whatever page you are on. |
| Page rail | The six pages. Your place is remembered between sessions. |
| Page area | Whatever the current page shows. |
| Status bar | What just happened, and how many landmarks are in the list. |
The window resizes from any edge or corner, not just the bottom-right, and it floats on top of Maya by default (Settings → Keep the window on top).
The toolbar

| Button | Does |
|---|---|
| New landmark | Creates a landmark from the current face selection and asks for its name. Ctrl+N |
| Assign | Assigns the selected landmark to the current selection. |
| Select faces | Selects the faces wearing the selected landmark. |
| Mirror | Runs Mirror Assignments with whatever the Symmetry page is set to. |
| Frame | Selects the landmark's faces and frames them in the viewport. |
| Isolate | Isolates those faces in the active viewport. Press again to turn isolation off. |
| Refresh | Rebuilds the list from the scene. F5 |
| Help | A short reminder of what each page is for. |
On the right, above the help button, is the selection read-out — 342 faces
selected, 1 object selected, nothing selected. It follows Maya's
selection live, so you can tell whether an assign is about to do what you think.
The page rail
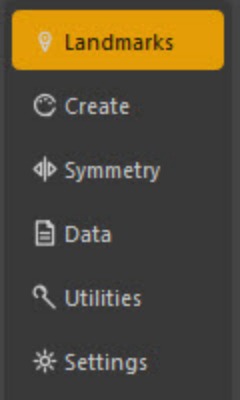
| Page | For |
|---|---|
| Landmarks | The working list: create, assign, select, recolour, rename, group, delete. |
| Create | Palette generators with a live preview. |
| Symmetry | Mirror assignments across the plane. |
| Data | Save and load landmark sets. |
| Utilities | Coverage, shells, transfer, vertex-colour bake, cleanup. |
| Settings | Preferences. |
The landmark list

| Column | Shows | Editable |
|---|---|---|
| Landmark | The colour chip and the shader's name. | Double-click to rename in place. |
| Shader | The node type it currently is — surfaceShader, lambert, blinn… |
Double-click to open the type menu. |
| Group | The label you filed it under. | Double-click to edit in place. |
| Faces | How many faces are wearing it right now. | Read-only. |
Click a column header to sort by it. Above the list are the filter field (type to narrow by name) and the group filter (show one group at a time).
The row of actions

| Button | Does |
|---|---|
| New landmark from the current selection | |
| Duplicate the selected landmark | |
| Rename | |
| Put the selected landmarks in a group | |
| Pick a new colour | |
| Change the shader type | |
| Select the shader node and open the Attribute Editor | |
| Re-spread the selected landmarks' colours with the current generator | |
| Report the list in hue order | |
| Assign to the current selection | |
Send those faces back to lambert1 |
|
| Delete the selected landmarks |
Everything here is also in the right-click menu, which has a few entries besides.
The right-click menu
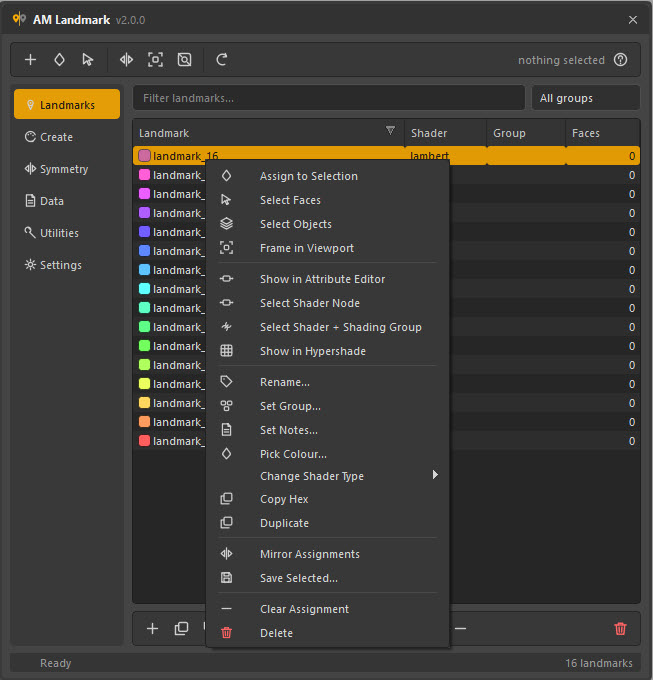
Grouped by what they touch:
| Group | Entries |
|---|---|
| The scene selection | Assign to Selection · Select Faces · Select Objects · Frame in Viewport |
| The shader node | Show in Attribute Editor · Select Shader Node · Select Shader + Shading Group · Show in Hypershade |
| The landmark itself | Rename… · Set Group… · Set Notes… · Pick Colour… · Change Shader Type ▸ · Copy Hex · Duplicate |
| Whole-pass actions | Mirror Assignments · Save Selected… |
| Destructive | Clear Assignment · Delete |
The status bar

Every action reports here rather than in a dialog: how many faces were assigned, how many landmarks were converted, what the mirror matched. Failures stay on screen instead of fading, and turn red.
On the right is the number of landmarks currently shown — which is the filtered count, so it tells you how many rows your search matched.
Why a status line and not a pop-up
Almost everything this tool does is reversible and low-stakes, and a modal dialog for each would make a twenty-landmark pass into forty clicks. The dialogs that remain are the ones that ask a real question: deleting landmarks, adopting materials, and load reports that mention meshes the scene does not have.