Shaders
Which type to use, how to change it later without losing a single face assignment, and how to get at the node when the tool is in your way.
Which type
Shader on the Create page decides what a new landmark is made of. The list's Shader column shows what each existing one currently is.
| Type | What it does | Reach for it when |
|---|---|---|
| surfaceShader | Ignores lighting completely: the viewport colour is the colour you picked. | Marking up. This is what a landmark is for, and it is the default. |
| lambert | Ordinary diffuse. Shades with the light. | The marks have to look like part of a lit render, or a downstream tool expects a real material. |
| blinn | Diffuse plus a specular highlight. | The same, on something that should read as glossy. |
| standardSurface | Maya's modern physical shader. | The landmark is going to become the actual look-dev material. |
| aiStandardSurface | Arnold's. Only offered when mtoa is loaded. | The same, in an Arnold pipeline. |
Only the types this Maya can actually create are offered — a menu entry that raises the moment you pick it is worse than not offering it.
Why flat is the default
A landmark is a marker, not a material. Under a lambert, the same
landmark reads as three different colours across a curved surface, and two
landmarks that are obviously different on the flat swatch become the same
dark smear in shadow. surfaceShader makes the swatch in the tool and the
region on the model the same colour, which is the entire job.
Each type keeps the colour in a different plug, which the tool handles for you:
| Type | Colour plug |
|---|---|
surfaceShader |
outColor |
lambert, blinn, phong |
color |
standardSurface, aiStandardSurface |
baseColor |
Changing type later
You do not have to decide up front. Select one or more landmarks and use the button in the row of actions, the Shader column (double-click), or Change Shader Type in the right-click menu.
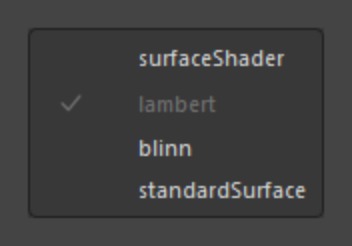
The type the selection already is carries a tick and cannot be picked again. A mixed selection shows no tick.
What survives the conversion:
| Travels across | Does not |
|---|---|
| The colour | Type-specific look-dev values — roughness, specular colour, coat |
| Transparency, where both types have it | |
| The landmark tag, group, notes and id | |
| The whole face assignment |
The assignment surviving is the point. Faces belong to the shading group, not to the shader, so the conversion keeps the group and replaces only the node driving it. Nothing is re-assigned, nothing is momentarily unshaded, and a 40 000-face landmark converts as fast as an empty one. It is one undo step.
from Am_landmark.core import shaders
shaders.change_shader_type("jaw_line", "blinn")
shaders.available_shader_types()      # only what this Maya can create
Editing by hand
The tool owns colour, naming and assignment. Everything else a shader can do — roughness, a texture on the colour plug, an override somebody needs for one shot — belongs to Maya's own editors, so the node is always one click away.
| Action | Does |
|---|---|
| the node button, or Show in Attribute Editor | Selects the shader and brings it up in the AE. |
| Select Shader Node | Puts the shader in Maya's selection and nothing else. |
| Select Shader + Shading Group | Both nodes. |
| Show in Hypershade | Selects them and opens the Hypershade. |
Why the shading group is selected with noExpand
A shading group is an object set. Selecting one the ordinary way replaces
it in the selection with the faces it contains — the exact opposite of what
was asked for. The tool always selects it with noExpand, so you get the
set itself and the Attribute Editor shows you the group.
Clicking to edit
If you are spending a session dialling shaders in rather than assigning them, set Settings → Clicking a landmark selects → Its shader node. Then every click in the list hands the Attribute Editor the next shader.
| Setting | A click in the list |
|---|---|
| Nothing (default) | Leaves the viewport selection alone — which is what you want while assigning: pick faces once, try several landmarks on them. |
| Its faces | Selects the geometry wearing it. |
| Its shader node | Selects the shader, for the Attribute Editor. |
Colour still round-trips: change .color in the Attribute Editor and the list's
chip catches up on the next refresh.
Colour space
A shader's colour plug holds rendering (linear) values when colour management is on, while the swatch you picked is display (sRGB). Left alone, the two are written as-is: what you picked is what is in the plug.
Settings → Write colours through sRGB to linear converts on the way in and back on the way out.
| Leave it off when | Turn it on when |
|---|---|
Your landmarks are flat surfaceShader markers |
Your landmarks are real materials in a colour-managed scene |
| Colour management is off | You are matching a colour from somewhere else exactly |
| The colours look right (the usual case) | Everything renders noticeably darker than the swatch |
It is off by default because silently darkening every colour would be the wrong default for the tool's main use — and because a flat marker wants the raw value you picked.
Switching it re-reads every landmark's colour, so the list's chips update immediately and you can see which way round you want it.
Transparency
Where a type supports it, transparency is available from the API and travels across a type change:
from Am_landmark.core import shaders
shaders.set_transparency("jaw_line", 0.4)
shaders.get_transparency("jaw_line")
surfaceShader uses outTransparency; lambert and blinn use
transparency. standardSurface has no equivalent colour plug — its
transmission is a different thing — so it is left alone there.