The landmark list
The page you will live on. Every landmark in the scene, what it is wearing, and everything you can do to it.
F5 Refresh from the scene Ctrl+N New landmark Del Delete (with the list focused) Esc Close
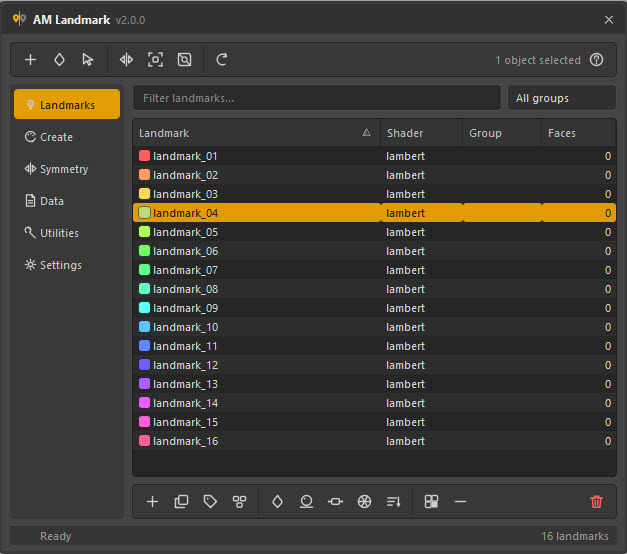
What is in the list
Every shader in the scene carrying the amLandmark tag, sorted by whichever
column you clicked last.
| Column | Shows |
|---|---|
| Landmark | The colour chip and the shader name. |
| Shader | The node type — see Shaders. |
| Group | The label you filed it under, if any. |
| Faces | How many faces are wearing it right now. |
Hover any row for a tooltip with the hex colour, the face count, the meshes involved and the notes.
The list follows the scene: it rebuilds itself when the scene is opened, on undo and redo, and whenever you make a change from the window. Settings → Follow the scene automatically turns that off for a very heavy scene where you would rather press F5 yourself.
Finding one
- Filter field — type any part of a name. The count on the right of the status bar shows how many rows matched.
- Group filter — the drop-down beside it lists every group in use.
- Column headers — click to sort. Sorting by Faces finds the landmark that quietly ate half the model; sorting by Shader groups the types.
Creating
| How | What happens |
|---|---|
| The + button or Ctrl+N | Asks for a name, creates the landmark with the next colour from the Create page's palette, and assigns it to whatever is selected. |
| Create page → Create | Makes a whole palette at once. |
| Utilities → Landmarks from shells | One landmark per connected piece of a mesh. |
| Duplicate | A copy of the selected landmark — same colour, same group, same notes, its own shading group, nothing assigned. |
Assigning
Select faces in the viewport, select one landmark in the list, press the droplet button (or Assign to Selection in the right-click menu).
The selection can be:
| You selected | It assigns |
|---|---|
| Faces | Exactly those faces. |
| A whole object | The whole object, as an object-level assignment rather than a per-face one. |
| Vertices or edges | The faces they touch. |
| A group node | Every mesh under it. |
Pick faces once, try several landmarks
Set Settings → Clicking a landmark selects → Nothing (the default) and the list never touches your viewport selection. Pick a patch, then click landmark after landmark and press assign until one looks right.
Clear Assignment is the opposite: it sends the landmark's faces back to
lambert1, leaving the landmark itself in the list.
Selecting from a landmark
| Action | Selects |
|---|---|
| Select Faces | The faces wearing it. Multi-select landmarks first to get all of them at once. |
| Select Objects | The transforms of the meshes it appears on. |
| Frame in Viewport | Selects the faces, then frames them. |
| Isolate | Isolates the faces in the active viewport. Press the button again to leave isolation. |
| Select Shader Node | The shader itself, for the Attribute Editor — see Shaders. |
Editing a landmark
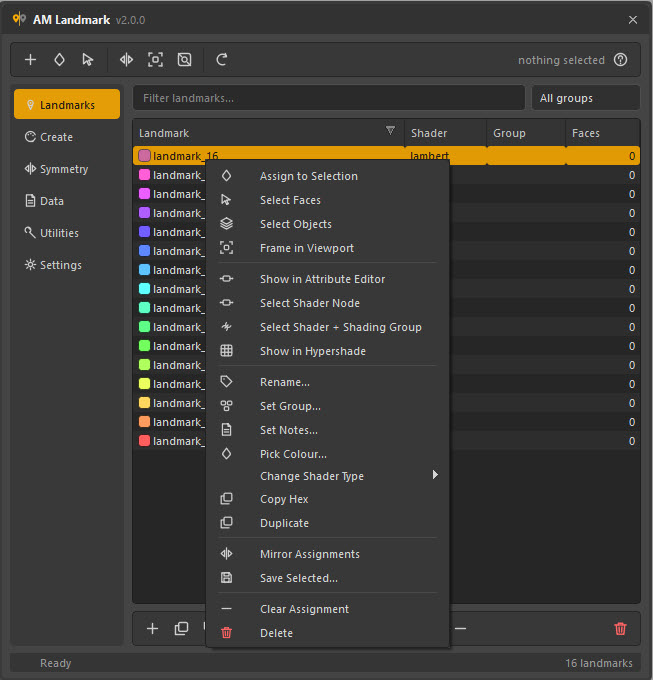
Everything in the row of buttons, plus the entries that only make sense one at a time.
| Entry | Does |
|---|---|
| Rename… | Renames the shader, and its shading group with it. Also available by double-clicking the name in the list. |
| Set Group… | Sets the group on every selected landmark at once. Also by double-clicking the Group cell. |
| Set Notes… | Free text stored on the shader — what the region is for, who asked for it. Shows up in the row tooltip. |
| Pick Colour… | Maya's own colour editor. With several landmarks selected, they all take the new colour. |
| Copy Hex | Puts #RRGGBB on the clipboard. |
| Change Shader Type ▸ | Converts the node type without losing the assignment. |
| Duplicate | As above. |
| Mirror Assignments | Runs the Symmetry page's current settings. |
| Save Selected… | Writes only the selected landmarks to a file. |
| Delete | Removes the landmarks; their faces go back to lambert1. |
Renaming never silently collides: a name already in use gets a numeric suffix rather than replacing the existing node.
Recolouring several at once
The palette button () re-runs the Create page's current generator across the selected landmarks — or across all of them if none are selected — keeping every name, group and assignment. It is the fastest way to fix a palette that turned out too dark, or to re-spread twenty colours that have drifted together.
The sort button () reports the list in hue order in the status bar, which tells you what a re-spread would be working with.
Deleting
Delete removes the shader and its shading group, and pushes the faces back to
lambert1 first.
Why the faces go back to lambert1
Deleting a shading group that still has members leaves those faces with no shading assignment at all, which renders as an invisible hole in the viewport and is very hard to diagnose later. Restoring the default first costs nothing and cannot bite anyone.
Deletion asks first (Settings → Ask before deleting landmarks), and is a single undo step either way.
Utilities → Delete Unused removes every landmark nothing is assigned to, which is the usual way a palette-generation experiment gets cleaned up.
When something goes wrong
Errors report in the status bar and stay there — they do not fade — and the full traceback goes to the script editor.
Every operation runs inside one undo chunk, including one that fails part of the way through, so a single Ctrl+Z takes the scene back to before you pressed the button. There is no half-finished state to clean up by hand.