Brush settings
Right-click the Brush slot and Brush Properties opens: the brush's basic settings at the top, its dynamics below, and the list of brushes on the right.
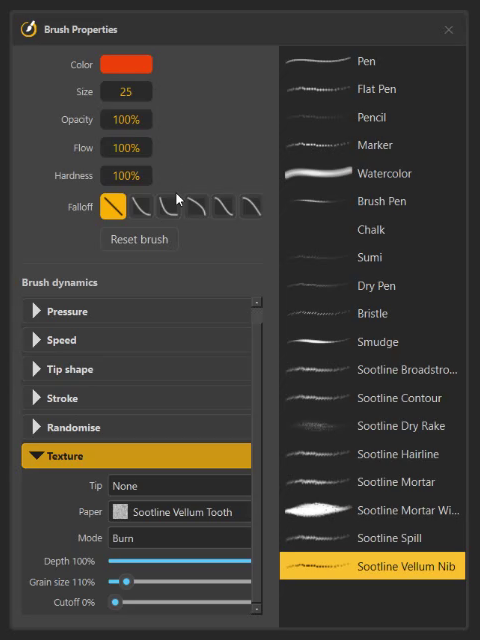
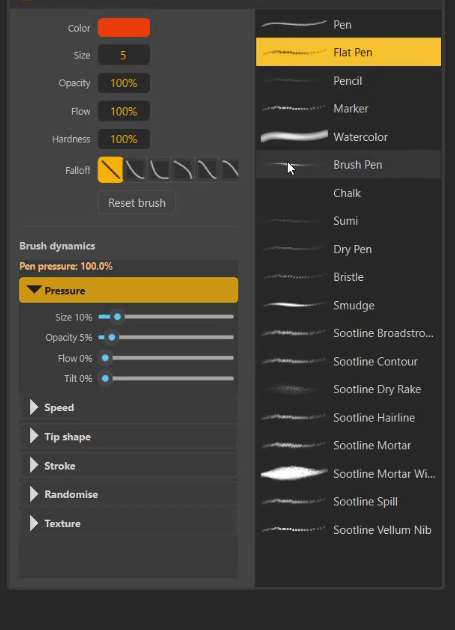
Changes apply to the next stroke straight away — and, if strokes are selected with the Selection tool, to those strokes too.
The basics
| Setting | Range | What it does |
|---|---|---|
| Color | — | The brush colour. Click to open Pick Color. Ctrl + drag left / right on it changes the lightness. |
| Size | 1 – 512 | The brush diameter. |
| Opacity | 1 – 100 % | How strong a stroke is. |
| Flow | 1 – 100 % | Pigment laid down per stamp. Low flow builds up gradually where you go over the same area. |
| Hardness | 0 – 100 % | Edge softness — lower is softer. (Pen, Flat Pen and Brush Pen are always hard-edged.) |
| Falloff | six curves | How the edge fades: Linear, Soft, Plateau, Sharp, S-curve, Bell. |
| Reset brush | — | Discard every change to this brush and put it back to how it shipped. |
Brush dynamics
The sections fold open and shut; Pressure starts open. Each slider shows its value in its label — "Size 85%".
Pressure
| Slider | What it does |
|---|---|
| Size | How much pen pressure changes the width. |
| Opacity | How much pressure changes the opacity. |
| Flow | How much pressure changes the pigment per stamp. Pair a low value with low Flow for a brush that builds up slowly. |
| Tilt | How much pen tilt widens the stroke — tilt the pen to shade broadly. |
At 0 % the setting ignores pressure; at 100 % the lightest touch shrinks the stroke to that brush's minimum.
Speed
| Slider | What it does |
|---|---|
| Size taper | Fast strokes get thinner — the whip-like exit of real ink. |
| Opacity taper | Fast strokes get lighter. |
Tip shape
| Setting | What it does |
|---|---|
| Width / Height | The tip's proportions (10 – 300 %). Equal is round; a lower Height gives a chisel or calligraphic nib. |
| Angle | The tip's angle, 0 – 360°. |
| Sharpness | How needle-fine the ends get at low pressure (Pen, Brush Pen and Marker). |
| Flip tip horizontally | Mirror the tip. |
Stroke
| Setting | What it does |
|---|---|
| Spacing | Distance between stamps, as a fraction of the size. Small is a solid line, large a dotted trail. |
| Smoothing | Steadies a shaky line, at the cost of a little lag. (Applies to the mouse; pen strokes are left as drawn.) |
| Fade in | How much of the start ramps up from nothing. |
| Fade out | How much of the end tapers away — applied once the stroke is finished. |
Randomise
| Setting | What it does |
|---|---|
| Scatter | A random offset for each stamp. |
| Count | Stamps per step, 1 – 12. Raise it with Scatter for spray and foliage. |
| Rotation | Random rotation per stamp. |
| Size var | Random size per stamp. |
| Noise | General size and opacity noise. |
Rotation, Size var and Noise act on the round-tipped brushes — Pen, Brush Pen, Watercolor and Smudge. Brushes drawn with a shaped or image tip (Pencil, Marker, Chalk, Sumi, Dry Pen, Bristle, Flat Pen, the Sootline pack, and any brush you give a Tip) ignore them; on those, Count adds stamps only when Scatter is above 0.
Texture
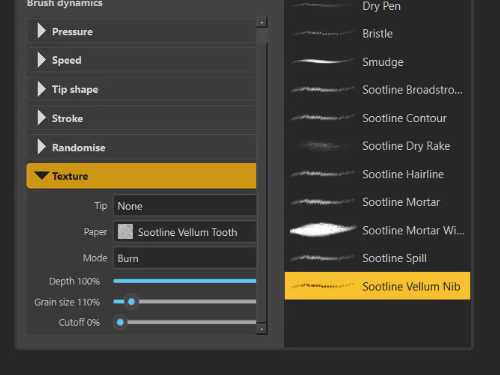
| Setting | What it does |
|---|---|
| Tip | An image used as the stamp shape. None uses the brush's built-in round or flat tip. |
| Paper | A paper or surface pattern the stroke is filtered through. It is fixed to the screen, not the stroke, so every stroke reveals the same surface. |
| Mode | How the paper eats into the stroke: Paper thins it evenly (ink on textured stock); Speckle breaks it into flecks (chalk, charcoal); Graphite is a fine built-in tooth (pencil); Burn keeps a solid core and lets the paper bite the edges. |
| Depth | How hard the paper bites. 0 switches it off. |
| Grain size | How coarse the paper is, 20 – 1200 %. |
| Cutoff | Speckle mode only: coverage below this is dropped, which breaks a stroke into separate flecks. |
Picking a Paper while Mode is None switches Mode to Paper for you.
The Tip and Paper lists show the patterns shipped with Am_sketch and your own, marked (mine). See Your own brushes and textures to add patterns.
Your own brushes
Right-click the brush list for its menu:
| Item | What it does |
|---|---|
| Add brush | Copies the current brush as New Brush and selects it — the way to make a brush of your own. |
| Rename brush | Renames a brush you added. |
| Remove brush | Deletes a brush you added. Built-in brushes cannot be removed. |
| Save current settings | Keeps your changes to this brush across restarts. |
| Reset to default | Same as Reset brush. |
| Import texture... | Turns an image into a new brush (PNG, JPG, BMP, TIFF or WebP; light parts paint). |
Changes are temporary until you save them
Tweaking a brush changes it for this session only. Choose Save current settings to keep the change — or Add brush first to keep the original and make your version a brush of its own.
A built-in brush with a different paper
To give a built-in brush (Pencil, Pen…) a different Tip or Paper for good, Add brush first and change the copy: a built-in brush keeps its own patterns when Am_sketch restarts.
Your brushes are stored in Documents\Am_sketch\presets — see
Files and folders.