Creating items
Six ways to get a shape onto the canvas. Which one you reach for decides how much of the evening you spend binding.
A Draw one N Pen tool Ctrl+Shift+A One per selected object Ctrl+Space Shape library
The six ways
| Way | Bound? | Best for |
|---|---|---|
| Hold A and drag | No | Blocking out a layout fast |
| Pen tool (N) | No | Outlines that must follow artwork exactly |
| Ctrl+Shift+A — one per Maya object | Yes | The honest start for any body picker |
| Add With Selected | Yes | One shape driving several controls at once |
| Shape library (Ctrl+Space) | No | Consistent, reusable button shapes |
| From artwork | No | Tracing a model sheet, or importing an SVG |
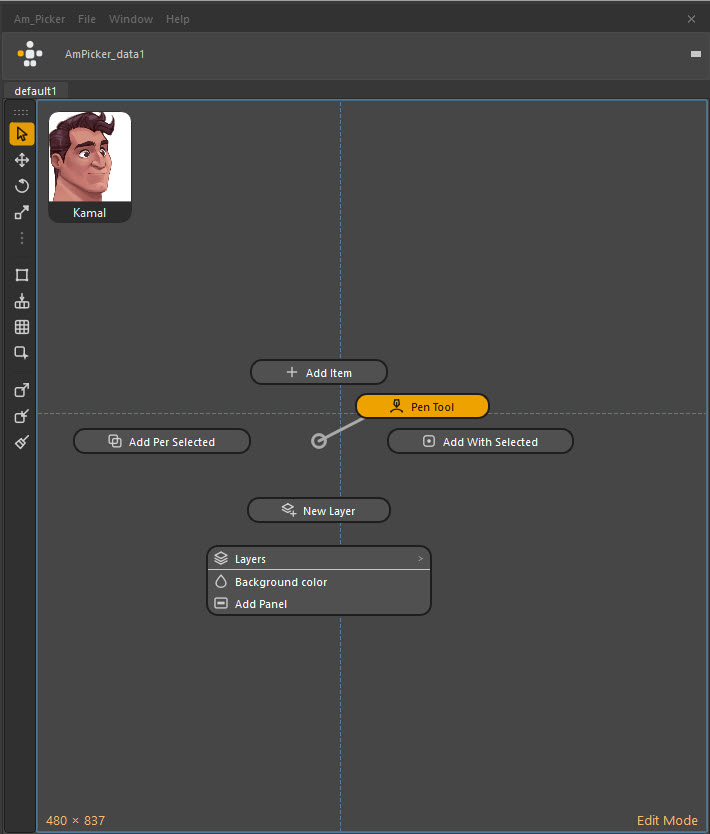
Right-clicking empty canvas gives you the creation commands. With marking menus on, each has a direction — the gesture is the same every time, so it becomes muscle memory.
Draw one by hand — A
Hold A and drag. You get a polygon where you dragged.
This is the blocking tool: fast, rough, and unbound. Use it when you are working out where things go rather than what they are.
Quads take rounded corners straight away:
| Key | Corner radius |
|---|---|
| 1 | Off — square corners |
| 2 | 4 px |
| 3 | 8 px |
| 4 | 16 px |
One item per Maya object — Ctrl+Shift+A
Select the controls in Maya. Press Ctrl+Shift+A. You get one item per selected object, already bound to it, named after it.
This is almost always the right way to start a body picker. Select the entire control rig, get a hundred bound squares in a heap, and spend your time arranging rather than binding — which is the work that actually needs judgement.
Why binding first is the cheaper order
Binding is the step with no visual feedback: an unbound square and a bound square look identical. Leave it to the end and you are matching two hundred anonymous shapes against two hundred control names by memory, and every mistake surfaces weeks later as "that button selects the wrong finger".
Generate bound, arrange second, and the picker is correct from the first minute — you are only ever making it nicer.
One item for several controls — Add With Selected
Select several controls in Maya, then canvas right-click → Add With Selected. You get one item bound to all of them.
Use it for things that are always used together: a whole hand, a row of finger tips, every control on a prop.
From the shape library — Ctrl+Space
The library holds 77 ready-made shapes. Click or drag one onto the canvas.
Use it to keep a picker consistent — the same circle for every FK control, the same arrow for every IK — and to save your own shapes for reuse across characters. See Shape library.
From artwork
Two generators, both covered in Generating items from art:
- Image to Picker traces a bitmap's silhouette and makes items from the outlines it finds. Point it at a concept drawing.
- Vector to Picker imports an SVG and gives you one item per outline, with real Bézier curves and holes cut out. This is the highest-quality route by a distance, and Am_Picker ships biped templates for it.
Where new items land
Two rules decide where a new item goes:
Layer. By default a new item joins the layer selected in the Picker Outliner — Preferences → General → Item creation. If the highlighted layer is hidden, the item is still created there and the canvas says so; it will be waiting in the Outliner when you turn the layer back on.
Grid. A new item is assigned to the active grid, which is whichever grid is selected in the Picker Grid window. That grid is what the item mirrors across and snaps to. See Grids.
Duplicating
Once one item is right, copy it rather than drawing another:
| Key | Does |
|---|---|
| Shift+D | Duplicate |
| Ctrl+D | Duplicate in place |
| Ctrl+Shift+D | Duplicate and mirror — the left-hand button becomes the right-hand one, control name included |
| Ctrl+C / Ctrl+V | Copy / paste |
| Ctrl+Shift+V | Paste options — choose what to paste (colour only, shape only, …) |
Ctrl+Shift+D is the one that saves real time on a symmetrical character: it swaps the left/right keyword in both the item name and its bound control, using the pairs set in Preferences → General → Mirror.
Labelling items
Double-click an item on the canvas and type.
An edit box opens over the item in its own text colour and font, so you are typing on the shape rather than in a dialog somewhere else. Enter commits it, Esc cancels.
This is the fastest way to put IK, FK, L, R, a finger number or a body
part name onto a button — and on a picker where every shape is the same colour,
a label is often the difference between usable and not.
The label's font, size and colour are in the Channel Box's Text section, and it can also be set there by hand if you would rather not double-click.
Double-click means two different things
With handles visible (P), double-clicking an edge inserts a vertex there — see Drawing shapes.
With handles off, double-clicking starts the label editor. If you get the wrong one, press P and try again.
Deleting
Del removes the selected items.
If Del does nothing
Maya sometimes takes the Delete key before Qt sees it. Make sure the canvas has focus — click empty canvas once — and that you are in Edit mode. You can also delete from the Picker Outliner, which is unaffected.