Arranging the layout
Transform, snap, align, mirror. This is the half of picker-building that decides whether people enjoy using it.
W Move E Rotate R Scale Ctrl+T Free transform Q Hide gizmos S Manip space
Gizmos
| Key | Tool |
|---|---|
| W | Move |
| E | Rotate |
| R | Scale |
| Ctrl+T | Free transform — move, rotate and scale from one box |
| Q | Hide all manipulators |
| S | Toggle local / global manipulator space |
| ++=++ / - | Lengthen / shorten the manipulator arms |
Hold-to-modify keys, all of which work while you are mid-drag:
| Hold | Does |
|---|---|
| D | Move the edit pivot — reposition what a rotate or scale happens around |
| X | Snap to the grid while moving |
| V | Snap to points — other items' pivots and vertices |
Whether a gizmo appears on every selected item or only on the anchor, and the rotation snap increment, are in Preferences → General → Manipulators.
Nudging
Arrow keys move the selection one pixel. Shift and an arrow moves it five.
This is how a layout gets finished. A gizmo drag gets a button roughly right; the last two pixels are arrow keys, and they are worth doing — a row of buttons that is nearly aligned looks like a mistake, and one that is exactly aligned looks designed.
Aligning
With items selected the numpad aligns whole items. With vertex handles selected (P to show them) the same keys align vertices.
| Key | Does |
|---|---|
| ++num-4++ | Align left edges |
| ++num-6++ | Align right edges |
| ++num-8++ | Align tops |
| ++num-2++ | Align bottoms |
| ++num-5++ | Match the last-selected item's transform — position and rotation |
| ++num-0++ | Move the selection to the canvas origin |
The Align button on the edit toolbar has the spacing commands too:
| Command | Does |
|---|---|
| Distribute horizontally / vertically | Even spacing between item centres |
| Equal gaps horizontally / vertically | Even spacing between item outlines, so items of different sizes look evenly spread — and a stack of overlapping items fans out into a row |
| Expand / Contract | Push the selection apart, or pull it together, one step per click |
++num-5++ is the one to remember: get one button exactly right, then select the others, select it last, and press ++num-5++ to give them all its size and angle.
The same commands are on the tool strip, if you would rather click.
Mirroring
A symmetrical character should be built once and mirrored, not built twice. The full story — Duplicate + Mirror Options, live mirror and shape symmetry — is on Mirroring. The keys:
| Key | Does |
|---|---|
| ++num-7++ | Mirror the side identifier, preferring L → R |
| ++num-9++ | Mirror the side identifier, preferring R → L |
| ++ctrl+num-7++ / ++ctrl+num-9++ | The same, and mirror the polygon shape |
| ++num-1++ / ++num-3++ | With exactly two items selected: mirror one onto the other by X position |
| ++ctrl+num-1++ / ++ctrl+num-3++ | The same, and mirror the shape too |
| ++alt+num-1++ / ++alt+num-3++ | Mirror the colour only |
| Ctrl+Shift+D | Duplicate and mirror in one step |
What "side identifier" means
Mirroring swaps a left/right keyword in the item's name and in its bound control names. The keyword pairs are yours to define, in Preferences → General → Mirror:
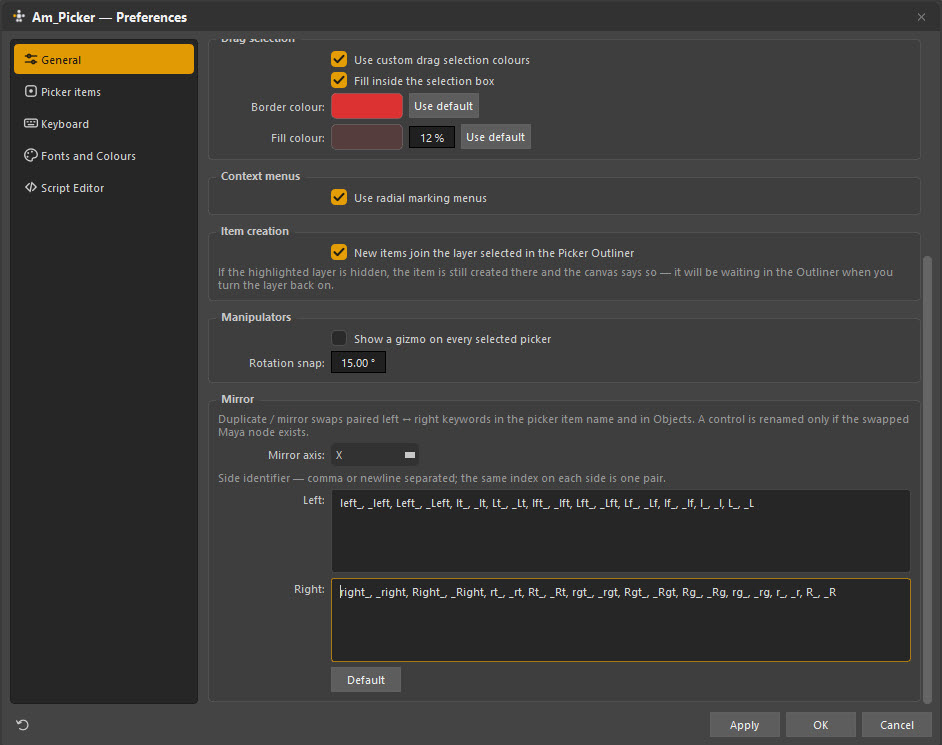
The stock lists cover the usual conventions — left_, _left, L_, _L,
lft_, Lt_ and so on, each paired with its right-hand equivalent at the same
index. Add your studio's convention if it is not there.
A control is only renamed if the swapped Maya node actually exists, so mirroring a button whose counterpart has a different name leaves the binding alone rather than pointing it at nothing.
Mirroring happens across the active grid's vertical line, not the canvas centre — which is what lets a face board mirror about the face rather than about the window. See Grids.
Toolbar menus
The edit toolbar carries Shape, Mirror, Duplicate and Align buttons that open the same commands as the right-click submenus, as narrow icon menus — Align is a grid of icons, the others pair each icon with a word or two. Hover a button for its full name and hotkey.
Every toolbar menu has the dashed tear-off line at the top. Click it and the menu stays open as its own window; a torn-off menu acts on whatever is selected when you click, and its rows stay up to date.
| Key | Does |
|---|---|
| Shift+D | Duplicate |
| Ctrl+D | Duplicate in place — the copies are selected, the originals are not |
| Ctrl+Shift+D | Duplicate + mirror |
Stacking order
Items overlap. Which one is on top is the Z depth channel, editable in the Channel Box or from the item's right-click menu.
The rule of thumb: big background shapes deep, small buttons shallow. An item that swallows clicks meant for buttons on top of it either needs its depth changing, or should be a mute shape instead.
Parenting
Items can be parented to each other, so moving the parent moves its children.
| Key | Does |
|---|---|
| Select children, then parent, then Parent under last selected | Parent them |
| Shift+P | Unparent the selection |
Use it for clusters that move as a unit — every button on a hand board, so you can reposition the whole hand without reselecting fifteen items. The hierarchy shows in the Picker Outliner.
A workable order
- Rough positions first. Get every item roughly where it belongs before refining anything. A layout you have not seen whole is a layout you will rearrange twice.
- Then sizes. Pick one button, get it right, and ++num-5++ the rest to it.
- Then alignment. Rows and columns with the numpad, then arrow keys.
- Then one side only. Build the left arm properly, mirror it with Ctrl+Shift+D, and check the bindings actually swapped.
- Colour last. Colour is a read of a finished layout, not a substitute for arranging it.