Picker Outliner
The tree of everything on the canvas — grids, panels, layers and items. Where a picker gets organised rather than drawn.
Window → Picker Outliner, or O.
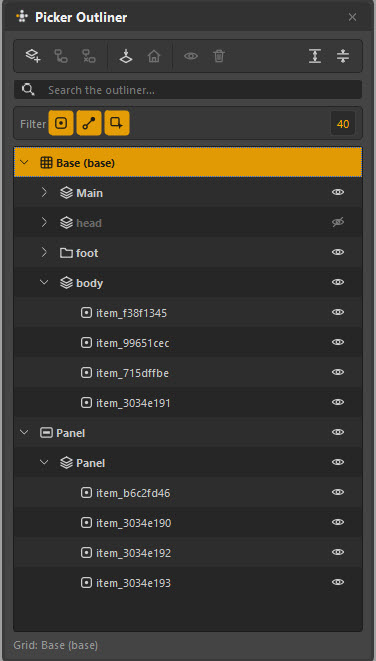
What the tree shows
Reading the screenshot from the top: a grid (Base) holding layers
(Main, head, body), a folder (foot), the items inside each layer,
and a panel with its own layer and items nested underneath.
| Row type | What it is |
|---|---|
| Grid | The alignment and mirror origin an item belongs to |
| Layer | A named group you can show and hide as a unit |
| Folder | Organisation only — no visibility of its own |
| Panel | A sub-page floating on the canvas, with its own layers |
| Item | One picker item |
The eye icon on each row toggles visibility. A greyed row — like head in the
screenshot — is hidden.
What it is for
Finding things. The search field filters the tree as you type. On a picker with four hundred items this is the only sane way to find one by name.
Selecting things you cannot click. An item hidden behind a background, or on a layer that is off, is still selectable here.
Layers. Making them, renaming them, and moving items between them.
Order. Dragging rows changes stacking, and dragging one item onto another parents it.
Bulk visibility. Turning off a whole layer while you work on what is behind it.
Layers
Layers can be transformed
A selected layer has its own Translate, Rotate, Scale and Pivot, and its own gizmos — see Layers and layer transforms. Ctrl+G makes a layer from the selection.
A layer is a named group of items with one visibility switch. Every picker starts
with one called Main.
Make them for things that are useful at different times — IK, FK, tweakers, face detail — because that is what an animator will want to turn off. A layer per body part sounds tidy but nobody ever wants to hide "the left arm".
| Action | How |
|---|---|
| New layer | The toolbar's add button, or canvas menu → New Layer |
| Rename | Double-click the row |
| Move items into it | Drag them onto it in the tree |
| Hide it | The eye icon |
| Delete it | Select and use the bin |
New items join the layer currently selected in the Outliner — set in Preferences → General → Item creation. Selecting the layer you are about to work in is the whole workflow.
If a new item does not appear
It was created on a hidden layer. The canvas tells you when this happens, and the item is waiting in the Outliner — turn the layer back on, or move the item.
Filters
The three toggles under the search field filter the tree by row type — items, link wires and mute shapes. The number on the right is how many rows match.
Turn everything but items off when you are hunting for a control; turn mute shapes on when you are tidying decoration.
Ordering and parenting
Dragging a row changes its position in the tree. Dragging an item onto another item parents it, so moving the parent on the canvas moves its children.
Tree order is not always draw order
Stacking on the canvas is ultimately the Z depth channel, which the Channel Box edits directly. Reordering in the tree is the convenient way to change it, but if an item stubbornly draws in the wrong place, check its Z depth — that is the value that decides.
Deleting from here
Selecting rows and pressing Del deletes them, and it works even when the canvas will not take the key. If Del on the canvas is being eaten by Maya, this is the reliable route.
A structure that works
For a full character:
Base (grid)
├── Main          — the controls used every shot
├── IK            — IK-specific controls and switches
├── FK            — FK-specific controls
├── Tweakers      — the detail layer, off by default for most people
└── Notes         — mute shapes and labels, never selected
Three to six layers is the useful range. Fewer and the visibility switch does nothing for anyone; more and nobody remembers what is on which.